
If you are a technician using precision screwdrivers, prepare to have tool bench envy! We recently received a picture from a customer (who prefers to remain anonymous) of their customized precision screwdriver set and I was so impressed I had to share. They started with our 50 hole precision screwdriver stand, added an additional 25 hole precision screwdriver stand, filled it with high quality Wiha Precision Screwdrivers and then customized the front edge with labels to make everything easy to find. Take a look!
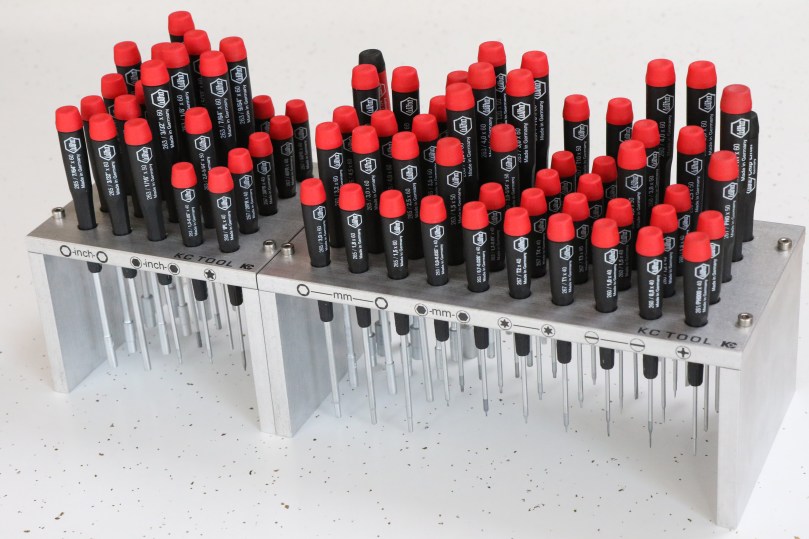
What a great picture! They even took the time to rotate all of the drivers to the same orientation. To me, this is a work of art and I really appreciate being able to share it. They were even kind enough to tell me exactly how they did the labeling which I will share at the bottom of this post.
If you are not familiar with our precision tool stand, let me tell you a little more about it. We like the Wiha Master Technician Sets that come with 50 drivers and a similar stand but what we found is the stand that comes in the Wiha sets doesn’t work well for the Wiha Pico Finish drivers or any of the other brands we carry. Also, Wiha would not sell us the stand individually so we set out to create our own. We designed ours with tapered holes that hold the drivers more securely in an upright position. It works well with the standard Wiha precision screwdrivers you see above and also works great with the Wiha Pico Finish, Witte Wittron, and Gedore lines of German precision screwdrivers seen below.

The stands are made locally (Olathe, KS) and we just received a new batch of the 50 hole version. We set out with the goal of wanting the stands to be simple, high quality and affordable. In an effort to keep costs down we used stock material and tumbled finish to save on machining time. The machine shop we have used said they will no longer make them at the current price, regardless of volume. We’re still negotiating to try and get them to run another batch of the 25 hole version at the agreed upon price but we don’t have a verdict on that yet. Please check our website or connect with us on social media to stay updated.
Precision Tool Stand, 25 hole
Precision Tool Stand, 50 hole
If you decide to buy one of our stands and would like to label the front check out the step-by-step instructions below submitted from the same customer who sent us that awesome photo.
Since the Wiha Precision drivers are not labeled (unlike the PicoFinish or the Wera), I had right away decided I needed to organize the tools in a way that would be easy to label and locate. That was one of the reason to get the KC Tool stand vs. the Wiha stand in the first place.
I liked the natural aluminum finish and wanted to keep the “OEM” look of the KC Tool logo, i.e. black ink straight on the aluminum, preferably on the front of the stand. For several months, I just used clear tape and hand-drawn graphics similar to those in the final version.
I recently had a need to get a labeler, so I went looking for one that could:
* Print imported graphics arranged on a very precise template (down to the mm) to align with the holes. That pretty much meant a PC-connected labeler with good software.
* Print on durable black-ink-on-clear tape to match the “OEM” look. This would be most easily done on labeler tape, with the major brands all carrying some version of adhesive black-ink-on-clear tape.
* Have a professional quality result.After some looking, I went with a Brother solution (vs. Epson or Dymo). I found the Brother software to be superior, the PC-printed graphics to be best (180×360 dpi and better rendered), and Brother had a reasonably priced labeler that could be used both from a PC and standalone with a WYSIWYG screen.
I ended up getting the following:
* Brother PT-D600 “PC Connectible Label Maker with Color Display”
* Brother TZe131 “Black on Clear 12mm (1/2-Inch) Labeling Tape”.It was going to be impossible to find tape whose width precisely matched the thickness of the front of the stand, and I wanted to make the graphics as big as possible. So, to get the cleanest look, I got the next larger width available (12mm), aligned the top of the tape with the top of the stand (just below the rounded edge) and folded the extra width underneath. This makes both tape edges invisible.
The graphics of the driver head types are taken straight from the KC Tool website and despite being web-resolution, still look good printed. The Brother P-Touch software is very easy to use to paste/resize graphics and align them precisely. The hole pitch seemed to be around 21.5mm and the software has a ruler to align all design elements which perfectly matches the printed output.
The only trial-an-error task was to find the biggest graphics and text sizes that would fit and look good. Overall, it was about 1/2hr of work to completion and very much worth it.”
Thank again to “L.M.” for sharing their great project.

What an impressive collection of precision screws drivers! I bet any technician would be a little jealous 🙂