
I’m a music junkie – I’ll freely admit it. And I’ll also admit that I’m old school. I love listening on the couch, in a “sweet spot” perfectly situated between the two speakers. When I reached a point of owning my own house I was ready to invest in a decent way to play my music – and I quickly found out how much this could cost. However, I also discovered whole groups of folks online building their own equipment, experimenting and tweaking. I also discovered that this could cost a whole lot less! Being a tinkerer by nature, I was hooked, and by the time I was done I had built a tube preamplifier, solid state amplifier and speakers, tweaking parts and wringing the best sound out of components I had built myself.
Fast forward to this year when my wife and I sold our house and moved into an apartment. Suddenly I was not at liberty to play my music at the hours (or volume levels) I had been accustomed to. So, I started researching headphones, and learned about using a headphone amplifier to get the best sound. I was immediately excited – an opportunity for a new project!
I decided right off the bat that I wanted to build an all vacuum tube amplifier. I love the sound that tubes offer, and I found a design online, the Bijou, that a well-known audio designer (cavalliaudio.com) had come up with and offered to the DIY community: buy the circuit boards, buy the parts and follow the instructions.
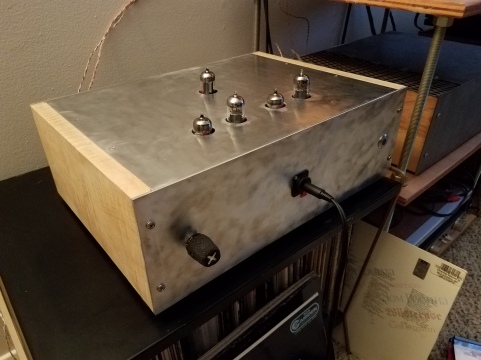
I quickly realized that building the case would be the most challenging part of the project. I used pieces of curly maple for the sides, which not only looked good with the aluminum, but made it easy to screw the front and back panels straight into the wood. Glued on pieces of 1 x 1 made perfect braces to allow the top and bottom to be secured. I was also lucky here in town, as local fixture, Metal by the Foot, cut the pieces of aluminum to size. All would have been well, had I given the correct dimensions. Two pieces were too big, but a little work with my jigsaw and several files had them close enough to fit.
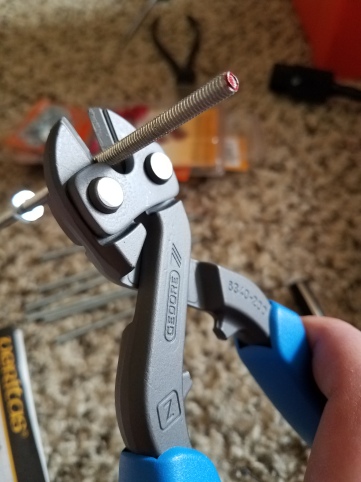
I also knew that the tubes had to stick out of the top, not only for the esthetic joy of glowing tubes, but also to dissipate the fair amount of heat they put off. I carefully marked off the mounting holes on the bottom, lined those up with the top where the tubes would extend, took a deep breath, and got out the hole saws. This arrangement required that the circuit boards be carefully fixed six inches up from the bottom of the case, parts soldered to the underside and tubes extending up. A pair of Gedore small bolt cutters made short work of 8-32 threaded rod, and some lengths of Pex tubing worked perfectly as spacers. The final step was using a power drill and a wire brush attachment to give the aluminum a matte, brushed finish.
After fitting the case together without the parts inside (and a fair amount of filing to get everything to fit just right), I was ready to actually solder. This part went fairly quickly, except for a couple of days lost to needing just one more resistor. Thankfully, Mouser, the electronics supply store, has no minimum order.
Once the parts were soldered on, it was time to do the wiring. Being red-green colorblind, my wife helps out by labelling each color wire on the transformer, which steps up the voltage from the power outlet to 520 volts. The tricky part of the placement of the circuit boards is that one wants the wiring of the signal to be as far away from the wiring for the power, which tends to give off noise which would be picked up and amplified. Not good. So I carefully twisted all the pairs of wires, trying to route them as far away from each other as possible.
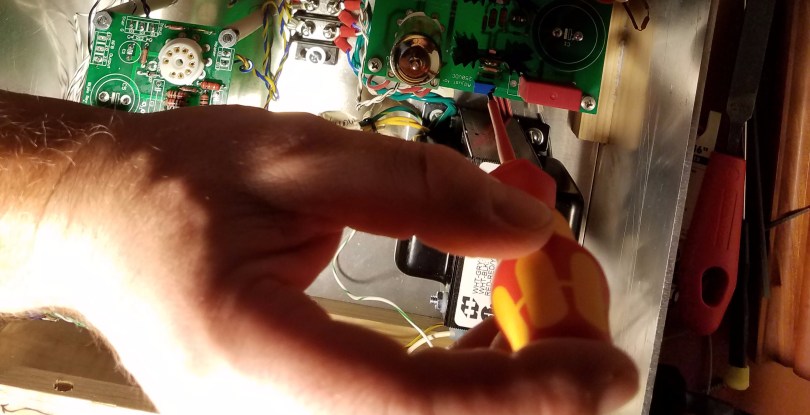
Once the wiring was complete, I took a deep breath, plugged in the power cord, and flipped the switch. ZZZZTTT! A spark and smoke was instantaneous. I immediately shut everything off. I had wired the small LED in the power switch backwards by mistake. Luckily nothing critical was broken. I tried a second time and everything was good. The only remaining step was to adjust the main voltage on the power supply. This involved taking a reading of the 250 volts and adjusting by turning a very small screw, very near the bare wires. I brought out my trusty insulated Wera screwdriver and carefully adjusted until the voltage was spot on.
Now it was time for the real test. I plugged in a pair of cheap headphones, just in case, and carefully turned the volume. Everything was good! New electronics always take a few hours of use to “break in”, and the sound has improved with each hour. I’m floored by how you can close your eyes and feel like you can point to the instruments in space: the drums are in the back in the middle, the guitar is nearer to the right, etc. I always learn my strengths and limitations on these types of projects, but in the end building something from scratch that brings me such pleasure is immensely satisfying.
I got all my tools at KC Tool, of course.


Neat project. The Gedore bolt cutters just got added to my wish list!